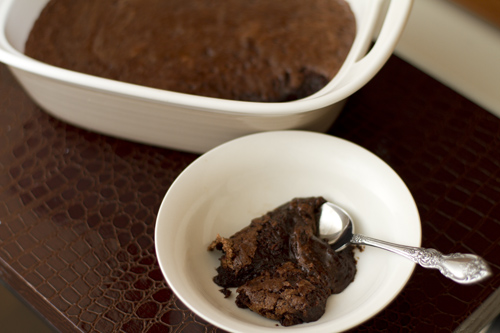
This brownie pudding took me a few tries to get just right. The first time it turned out to be more of a soft and very fudgy brownie that had a little too much butter. Not bad, but not at all what I wanted. It was gone by morning. I’m still not entirely sure what precisely went wrong (probably more than one thing), but I blame the water. Basically, the water for the water bath was too hot, and the dessert baked faster than it should have.
I debated on what to do on the next attempt besides reducing the heat of the water. It was indeed insanely rich…but was it too rich? The fact that it was so easily overbaked past the pudding stage means it’s pretty finicky, and finicky equals many failed first-time attempts, and many failed attempts means many grumpy people. No one wants that. With that in mind, I made the decision to incorporate the technique used to make pudding cake: boiling water on top of the batter. This would ensure that there would definitely be pudding and less chance of overbaking the dessert into brownies (not exactly a bad result, but not what we want). The only potential con was that it wouldn’t be as rich.
Nix that idea. What resulted was a strange pudding layer that didn’t stay in pudding form very long. Plus, the brownie part wasn’t as fudgy and smooth. I didn’t like it, and it did take longer than the first to disappear.
Finally at the third try, I decided what the batter needed was more of a reason to stay custardy, much like a flourless chocolate cake. That meant more egg. So, with one extra egg added, baking time watched closely, and the water at the heat of half a tiny volcano, I gave it a third go. It was perfect. However, I attribute the success more to the water and the baking time; the egg is merely a luxury addition that acts as a safety net for the pudding texture. In order for this recipe to turn out, you must use the amount of eggs called for in the recipe.
Enjoy everyone!
Gluten-Free, Brownie Pudding
Servings: 8
Preparation Time: 10 minutes
Ingredients:
- 1 cup salted grass-fed butter
- 1 tablespoon coconut flour
- 2 tablespoons rice flour (brown or white)
- 1/4 cup tapioca flour
- 5 eggs
- 1 1/2 cups sugar (or adjust to taste)
- 3/4 cup cocoa powder
- 1 tablespoon vanilla extract
Directions:
Preheat oven to 350 degrees F. Grease a 2-quart baking dish with coconut oil.
Melt butter over low heat. Set aside to cool. Mix flours together.
Beat eggs and sugar with an electric mixer on medium speed until thick and slightly lighter in color, 1–2 minutes. Add cocoa, vanilla, and flour mix. Mix well. Slowly pour butter in while mixing at low speed until well combined.
Pour mixture into prepared dish, place into a 9 x 13-inch pan and fill pan with hot tap water to come about half way up the sides of the quart dish. Bake in preheated oven for 30–40 minutes. Edges should be firm, but middle should jiggle and look very underbaked.
Cool and serve with freshly whipped cream, ice cream or as is.
Recipe courtesy of Sarah Shilhavy.
Recipe prepared by Sarah Shilhavy and photographed by Jeremiah Shilhavy.


